[Editor's Note: Folks, we regularly get two or more requests from readers for any help using Photoshop to convert a photo to a sketch -- pencil, charcoal, conte, or other mediums. This is by far the very best tutorial we've seen to date -- bar none! When we saw this technique in the Photoshop Photo Effects Cookbook we knew at once we had to share it with you! Thanks to O'Reilly Publishing we're able to bring the technique to you in its entirety! ]

Tim Shelbourne writes...
Ask any artist and they'll tell you that all the tubes of paint in the world cannot replace the simple pencil when it comes to artistic potential. Through the centuries, the litmus test of an artist's ability was demonstrated best through the medium of drawing. In days of yore, student painters spent years drawing with graphite to hone their skills.
The so-called "Sketch Filters" in Photoshop consistently yield very disappointing results; re-creating the quintessential sketch demands a little more inventiveness and an approach that mimics traditional techniques. Pencil sketches work especially well when very soft leaded pencils are used on a tinted paper, with a few touches of white chalk here and there to heighten the tones. This is what we'll produce here, digitally.
Don't worry if your drawing abilities aren't up to snuff, all that's required here is the ability to scribble!
 Note: Due to the size and number of diagrams, we've made these thumbnails clickable, and should open the actual diagram in a new, pop-up window. If they don't, be sure you have JAVA turned on, and Pop-up blocking turned off.
 (1) Open your original image in Photoshop.
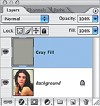
Go to Layer > New Fill Layer > Solid Color,
call it "Gray Fill," and click OK.
In the Color Picker, choose a light gray.
Go to Layer > New Fill Layer > Solid Color,
call it "Gray Fill," and click OK.
In the Color Picker, choose a light gray.
 (2) Click the "Create new fill or adjustment layer" icon at the base of the Layers palette and choose Pattern from the list.
 Click in the Pattern Swatch in the dialog box, hit the right-pointing arrow, and select Grayscale Paper.
Choose Fibers 1 from the swatch.
Increase the Pattern Scale to 340% and click OK. Set this layer to
Soft Light, and 35% opacity.
 (3) Right-click/Ctrl-click the background layer and choose Duplicate Layer, calling the layer "Glowing Edges."
 Drag this new layer to the top of the stack and go to
Filter > Stylize > Glowing Edges.
Use these values:
Edge Width 3, Edge Brightness 11, Smoothness 10.
Filter > Stylize > Glowing Edges.
Use these values:
Edge Width 3, Edge Brightness 11, Smoothness 10.
 (4) Invert the Glowing Edges layer using
 Image > Adjustments > Invert (Ctrl/Cmd+I).
This layer only needs to be black and white, so go to
Image > Adjustments > Desaturate (Ctrl/Cmd+Shift+U).
Image > Adjustments > Desaturate (Ctrl/Cmd+Shift+U).
Set the layer's blending mode to Multiply with an opacity of 15%.
 (5) Duplicate the background layer again, calling it "Sketch Layer," and drag this duplicate to the top of the stack.
 Desaturate this layer using Image
> Adjustments > Desaturate (Ctrl/ Cmd+Shift+U).
> Adjustments > Desaturate (Ctrl/ Cmd+Shift+U).
To use the layer as a base for the drawing, increase the contrast a little, by going to
Image > Adjustments > Brightness and Contrast. Drag the Contrast slider to the right to a value of 22.
Image > Adjustments > Brightness and Contrast. Drag the Contrast slider to the right to a value of 22.
Now set the layer blending mode to Darken and leave the opacity set to 100%.
 (6) We need to add some Noise to this layer to break the image up a little, so go to
 Filter > Noise > Add Noise.
Use an Amount of 12%, choose Gaussian for Distribution, and check Monochromatic.
 (7) Add a Hide All layer mask to this layer using Layer > Layer Mask > Hide All.
 To make the drawing, simply scribble on this layer mask using a special brush.
 (8) Select the Brush tool and click in the Brush Picker.
 Click the right-pointing arrow in the Picker and choose Dry Media Brushes. Scroll down the thumbnails and double-click Pastel on Charcoal Paper.
 (9) Hit F5 on the keyboard to display the Brush Options.
 Click the Other Dynamics panel and set the Opacity Jitter Control box to Pen Pressure.
Click Shape Dynamics and set the Size Jitter to Pen Pressure.
Set Minimum Diameter to 70%.
Remember, if you are not using a graphics tablet, you must control the opacity of the Brush using the Opacity slider in the Options bar.
Tim Shelbourne writes...
 (10) Now you can begin sketching...
 Be sure that the foreground color swatch is white.
In the Options bar, increase the size of the brush to between 20 and 25 pixels. Now begin to scribble onto the Sketch Layer's layer mask. At first, just concentrate on the main facial features within the image. Use just a little pressure on the stylus, or a very low opacity for the brush.
Scribble loosely over all of the required parts of the image, changing direction often to create a hand-shaded look.
 (11) Use plenty of cross-hatch scribble where the strokes overlap in opposite directions. Remember, there is no actual drawing ability whatsoever required here, we are simply scribbling to reveal the layer lying beneath the Layer mask.
  (12) Increase the size of the brush a little by using the right-facing square bracket key on the keyboard.
 Continue to scribble over the image, remembering to keep the brushwork nice and loose, building up the tones around the features of the face. In the hair, and around the outside of the image, use the brush at a bigger size and make the strokes even more sketchy.
 (13) Finally, reduce the size of the brush again and use it with white at full opacity to scribble more into the main features, adding some really dark strokes.
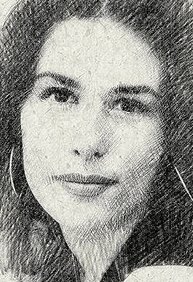
 See the "Before & After" with a rollover to compare the work to the original photo
Tip FEEL THE PRESSURE!
In exercises such as this, using a pressure-sensitive graphics tablet has huge advantages over using a mouse. Many of the special brushes in Photoshop, such as the one we're using here, have characteristics that can be set to respond directly to pressure. Although this exercise can be completed with a conventional mouse, the opacity of the brush has to be controlled manually in the Options bar. When using a graphics tablet we can simply apply more pressure to the stylus to create darker strokes. Graphics tablets are relatively cheap nowadays, and stunning results can be achieved with even the most inexpensive models.


No comments:
Post a Comment